(Finally) Migrating to Windows 11
Published on · 7 minutes reading time
Up until yesterday, I have continued using Windows 10, even though Windows 11 has been available for more than a year by then. A few years ago this would have been unthinkable for me. I still remember upgrading to the latest and greatest Windows versions at their respective release dates, eager to try out shiny new features like Metro, at a time when it was new. Windows 11 was the first version where I didn’t follow this behavior. The reason was, admittedly, a petty one, but it did make me not upgrade for more than a year: It was the removal of the ability to pin your taskbar to the side(s) of your screen. A lot of people have a lot of different complaints about Windows 11 and this was mine.
With that being said, I did upgrade yesterday, despite my initial reluctance. The reason was simply that I have felt the need to reset my PC for quite a while by now. Resetting presented me with the choice to either continue using Windows 10 or, finally, migrate to a fresh installation of Windows 11. I decided to go with 11. The pros definitely outweighed the cons, in my eyes (I mean, hey, the new explorer finally has native tabs!). I made a backup of all my files, made the upgrade from 10 to 11 and then, on Windows 11, started a full reset of my PC.
Then the fun part began: Playing around with and customizing Windows 11.
Tweaking and Finishing the Installation
Not Using a Microsoft Account During the Setup
The need to tweak already started in the setup screen. I was about to install the 22H2 version of Windows 11 which, according to other websites, got a lot more aggressive about forcing you to set up Windows with a Microsoft account.
I am not opposed to using one.
In fact, it is one of the first things I set up because I do appreciate the features tied to it.
But there is one thing that I absolutely don’t want to do:
Sign in to my Microsoft account during the initial Windows setup.
The reason is simple:
If you use a Microsoft account at this point in time, Windows will automatically name your
Windows user account using a 5-character long name derived from your Microsoft account’s settings.
I don’t want this to happen.
I want to keep using my old and trusted account name.
This is important to me because the name is used for your user folder (C:/Users/THE_NAME).
Having my “old” username here has become a big habit of mine, e.g. when working with paths.
I don’t want to be forced to change that habit.
In the past, I could simply use a workaround: During the setup, create a local account with my chosen username and then later sign in with my Microsoft account. This worked well. But not with Windows 11. First of all, you are not even given a choice to create a local account anymore. Even tricks like disconnecting from the internet didn’t work anymore. You were simply asked to reconnect and finish the setup later.
This is, frankly spoken, an incredibly user-hostile process which will hopefully be improved in the future (one can hope, right?). The only thing that helped me in the end was a comment on a forum that described the following steps which enable you to hack around this default setup flow:
- Follow the setup until you are asked to connect to a network.
- Press
SHIFT+F10to open a terminal. - Type
OOBE\BYPASSNRO. This will restart the PC and the setup process. - Again, follow the setup until you are asked to connect to a network.
- Now you are able to click a button called “I don’t have internet”, allowing you to continue the setup with a local account.
I find it a shame that such workarounds are necessary at all, but hey, it worked out well. I could finally finish the installation and start playing around with everything.
Configuring the Settings
One of the first things I always do when reinstalling Windows is to go through the settings. I obviously won’t list all the changes I made, but I do want to give the recommendation to do this yourself too, especially in the area of privacy. There are quite a few settings which you can, and probably should, change, depending on your preferences.
One thing that I did tweak (as much as I was allowed to) was, you guessed it, the taskbar. I just prefer having the hot corner on the bottom left and not cluttering it with things like widgets:

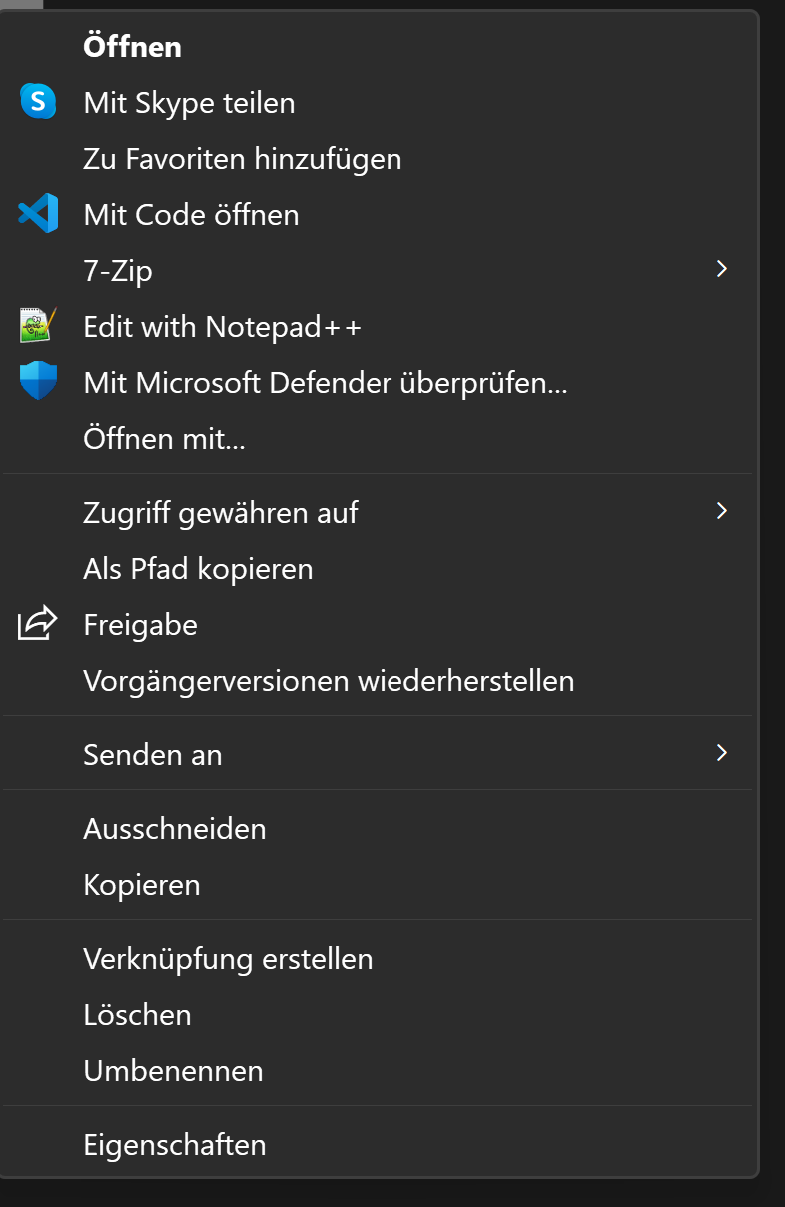
Restoring the Old File Explorer Context Menu
It is probably one of the changes that most people complain about: The additional click on “Show more options” required in the explorer’s context menu to access additional entries, e.g. items added by applications like 7zip. I knew about this before upgrading but didn’t expect it to be such a big deal, but frankly, it does get annoying when you know how easy using the old context menu was. I, too, wanted to have it back, even if the design of the new menu is much prettier.
This is, thankfully, an easy change. There are a lot of articles out there detailing which registry edits you have to make. I myself followed the steps outlined in this one and got my “old” context menu back, accessible with one single right-click:
Removing Preinstalled Apps (Twice)
Windows 11 does come with some preinstalled apps, like TikTok or Instagram. I have no need for those and directly uninstalled them. One weird thing that I encountered here is that, for some reason, some of those apps are automagically being reinstalled once. I suspect that this is some kind of bug? In any case, uninstalling them again, so far, kept them gone for good.
Installing Applications
One of the coolest features that were “recently” introduced is, in my opinion, winget.
winget made the installation of my default applications an incredibly simple and streamlined process.
Before the upgrade, I created a list of all my previously installed applications.
After the installation of Windows 11, all I had to do was run winget install THE_APP_ID for each
application that I wanted to reinstall.
This was much faster than navigating through each application’s custom homepage and finding the download links.
There were a few applications that aren’t on winget, like 7zip, but they were definitely in the minority.
WSL
Properly setting up and using WSL has been on my ToDo list for quite a while now, especially for doing web development. There is probably no better point in time for setting this up than when resetting your machine. And it was surprisingly easy. The docs are, in my opinion, very well structured and also very detailed, at least for my use cases. Setting up the WSL and connecting to it with VS Code was done in minutes. I’m eager to see how this workflow works out in the future.
Conclusion After One Day of Usage
So far, I have been using Windows 11 for roughly one day after finishing the installation and honestly, so far, I really like it. The rough edges outlined above were thankfully resolvable with some tweaking and, with all those rough edges being smoothed, Windows 11 is, so far, quite enjoyable. Something that I really appreciate is the new design language. It is often dismissed online (“who cares about design?”), but I personally really adore it, especially considering that I am using it on a daily basis - I want it to look good! It also does feel faster than my previous Windows 10 installation, but that might also be attributable to the reset itself. A fresh Windows 10 setup would most likely also have caused a noticeable performance improvement.
One thing that I’m eager to test in the near future is the Windows Subsystem for Android. I did install the necessary components but, like many other users, am failing at the moment at the Amazon Store’s login screen which keeps reappearing after a successful sign in. I’ll see if I can somehow fix this in the near future.